
flask vs django(vs fastAPI)
flask 튜토리얼
flask vs django
https://ddi-dev.com/blog/programming/django-vs-flask-which-better-your-web-app/
https://morioh.com/p/a91d4f7a5eb2
https://www.youtube.com/watch?v=gvzEcCF_yv8&ab_channel=GKTechFlex
https://wendys.tistory.com/172
단순 REST API 서버 구축 flask가 효율적
flask 튜토리얼
https://www.tutorialspoint.com/flask/index.htm
0. Home
- flask: web application framework(Python)
- prerequisites: hands-on expreience on HTML and Python
위 튜토리얼의 모든 과정을 완료하면 flask를 이용한 web 개발의 중간 레벨을 할 것임
1. Overview
- Web Framework
개발자가 응용 프로그램을 작성할 수 있도록 하는 라이브러리 및 모듈 모음
- Flask
Web application framework(Python), Armin Ronacher, based on the Werkzeug WSGI toolkit and Jinja2 emplate engine
- WSGI
Web Server Gateway Interface, Python web appication 개발의 표준, universal interface web server <-> web applications
- Werkzeug
Toolkit - requests, response objects, utility functions
- Jinja2
popular templating engine for Python, 특정 데이터 소스를 결합하여 동적 웹 페이지를 렌더링
Flask는 micro framwork로 언급됨(application을 단순하면서 확장 가능한 상태로 유지하는 것이 핵심), 데이터베이스 처리하는 기본 기능이 없지만 확장은 지원됨
2. Environment
- Prerequisite
Python version: 2.6이상 가능 3가능(3.3 이상), 베스트 2.7
- virtualenv
가상 python 환경 빌더, python 여러 버전 관리 용이
pip install virtualenv

# linux or mac
sudo apt-get install virtualenv
폴더생성
mkdir name_project
cd name_project
virtualenv venv
활성화
#linux or mac
venv/bin/activate

#windows
venv\scripts\activate
- Flask 설치
pip install Flask3. Application
- Hello.py 스크립트 작성
from flask import Flask
app = Flask(__name__)

@app.route('/')
def hello_world():
   return 'Hello World’

if __name__ == '__main__':
   app.run()
flask 모듈 필수 importing,
current module (__name__) as argument,
route() 기능: decorator, 어떤 URL이 관련 함수를 호출해야 하는지 application에 알려줌
app.route(rule, options)

 # rule: represents URL binding with the function.
 # options: list of parameters to be forwarded to the underlying Rule object
run() method of Flask class runs the application on the local development server.
app.run(host, port, debug, options)All parameters are optional
Sr.No.Parameters & Description
| 1 | host Hostname to listen on. Defaults to 127.0.0.1 (localhost). Set to ‘0.0.0.0’ to have server available externally |
| 2 | port Defaults to 5000 |
| 3 | debug Defaults to false. If set to true, provides a debug information |
| 4 | options To be forwarded to underlying Werkzeug server. |
- python script 실행
Python Hello.pycmd상 출력 메시지

내부 포트 접속하면 Hello World 나옴

4. Routing
- Routing technique: 사용자가 application URL을 기억할 수 있게 해줘서 원하는 페이지에 바로 접근할 수 있음.
- route() decorator URL을 bind한다?
@app.route(‘/hello’)
def hello_world():
   return ‘hello world’
- add_rul_rule() URL을 bind,,
def hello_world():
   return ‘hello world’
app.add_url_rule(‘/’, ‘hello’, hello_world)
5. Variable Rules
- dynamically URL 가능, <variable-name>, 규칙이 연결된 함수에 키워드로 연결
- route() decorator에 <name> 추가, http://localhost:5000/hello/TutorialsPoint로 접속하면 'TutotialsPoint'는 hello()의 argument로 쓰임
from flask import Flask
app = Flask(__name__)

@app.route('/hello/<name>')
def hello_name(name):
   return 'Hello %s!' % name

if __name__ == '__main__':
   app.run(debug = True)
- 해당 python script를 저장하고 실행시킨 후 http://localhost:5000/hello/TutorialsPoint로 접속하면 다음과 같음

- string variable aprt는 다음과 같이 구성할 수 있음
| 1 | int accepts integer |
| 2 | float For floating point value |
| 3 | path accepts slashes used as directory separator character |
- 아래와 같이 구성할 수도 있음, int or float
from flask import Flask
app= Flask(__name__)

@app.route('/blog/<int:postID>')
def show_blog(postID):
    return 'Blog NUmber %d' % postID

@app.route('/rev/<float:revNo>')
def revision(revNo):
    return 'Revision NUmber %f' % revNo

if __name__ == '__main__':
    app.run()

- Flask에서URL 규칙은 Werkzeug's 라우팅 모듈을 기반으로 하고 있음, unique하고 Apache가 제시한 선례를 기반으로 함
from flask import Flask
app = Flask(__name__)

@app.route('/flask')
def hello_flask():
   return 'Hello Flask'

@app.route('/python/')
def hello_python():
   return 'Hello Python'

if __name__ == '__main__':
   app.run()
python에 '/'가 추가됨 --> 해당 URL이 canonical URL이 됨.
/python, /python/ 모두 정상 작동 하며 /flask 작동 되지만 /flask/ URL은 404 Not Found 페이지 뜸
6. URL Building
- url_for() 기능, dynamically building 가능
from flask import Flask, redirect, url_for
app = Flask(__name__)

@app.route('/admin')
def hello_admin():
    return 'Hello Admin'

@app.route('/guest/<guest>')
def hello_guest(guest):
    return 'Hello %s as Guest' % guest

@app.route('/user/<name>')
def hello_user(name):
    if name == 'admin':
        return redirect(url_for('hello_admin'))
    else:
        return redirect(url_for('hello_guest', guest = name))

if __name__ == '__main__':
    app.run(debug = True)
/admin 접속시

/guest/1 접속시

/user/admin 접속시

/user/guest1 접속시

7. HTTP Methods
- HTTP protocol은 웹에서 데이터 통신의 기본임,
| 1 | GET Sends data in unencrypted form to the server. Most common method. |
| 2 | HEAD Same as GET, but without response body |
| 3 | POST Used to send HTML form data to server. Data received by POST method is not cached by server. |
| 4 | PUT Replaces all current representations of the target resource with the uploaded content. |
| 5 | DELETE Removes all current representations of the target resource given by a URL |
- Flask route 기본 GET이지만 route() decorator의 argument를 조정하여 변경 가능
- 다음과 같은 내용으로 login.html 저장
<html>
   <body>
      <form action = "http://localhost:5000/login" method = "post">
         <p>Enter Name:</p>
         <p><input type = "text" name = "nm" /></p>
         <p><input type = "submit" value = "submit" /></p>
      </form>
   </body>
</html>
- python script
from flask import Flask, redirect, url_for, request
app = Flask(__name__)

@app.route('/success/<name>')
def success(name):
   return 'welcome %s' % name

@app.route('/login',methods = ['POST', 'GET'])
def login():
   if request.method == 'POST':
      user = request.form['nm']
      return redirect(url_for('success',name = user))
   else:
      user = request.args.get('nm')
      return redirect(url_for('success',name = user))

if __name__ == '__main__':
   app.run(debug = True)
- login.html 실행
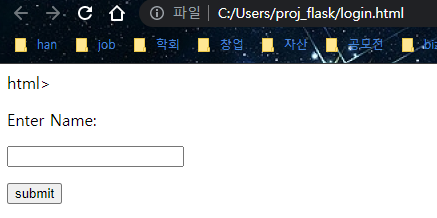
- guest1 입력

해당 데이터는 HTML의 action에 있는 URL에 POST됨
http://localhost/login은 login() 함수에 매핑, 서버는 POST 방식으로 데이터를 받았기 때문에 request를 이용해 매개변수의 값을 얻어야 함
- submit 클릭 후

HTML form의 method를 get으로 바꾸고 실행 해봐도 같은 결과를 볼 수 있음.
8. Templates
- HTML 형식으로 output을 받을 수 있음
from flask import Flask
app = Flask(__name__)

@app.route('/')
def index():
   return '<html><body><h1>Hello World</h1></body></html>'

if __name__ == '__main__':
   app.run(debug = True)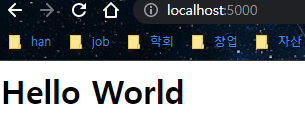
- python에서 HTML을 쓰는 것은 번거로움
- 이럴때 Jinja2 engine 사용 HTML 랜더링, render_template()
디렉토리를 다음과 같이 생성
- Application folder
- Hello.py
- templates
- hello.html
hello.html 파일 스크립트 생성
<!doctype html>
<html>
   <body>

      <h1>Hello {{ name }}!</h1>

   </body>
</html>
Hello.py 스크립트 생성
from flask import Flask, render_template
app = Flask(__name__)

@app.route('/hello/<user>')
def hello_name(user):
   return render_template('hello.html', name = user)

if __name__ == '__main__':
   app.run(debug = True)
http://localhost:5000/hello/guest1 접속
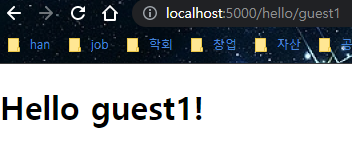
- Jinja2 는 HTML에서 다음 부호를 사용할 수 있음
The jinja2 template engine uses the following delimiters for escaping from HTML.
- {% ... %} for Statements
- {{ ... }} for Expressions to print to the template output
- {# ... #} for Comments not included in the template output
- # ... ## for Line Statements
python script
from flask import Flask, render_template
app = Flask(__name__)

@app.route('/hello/<int:score>')
def hello_name(score):
   return render_template('hello.html', marks = score)

if __name__ == '__main__':
   app.run(debug = True)
html script
<!doctype html>
<html>
   <body>
      {% if marks>50 %}
         <h1> Your result is pass!</h1>
      {% else %}
         <h1>Your result is fail</h1>
      {% endif %}
   </body>
</html>
/hello/70 입력시

/hello/30 입력시
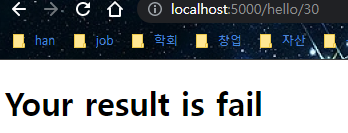
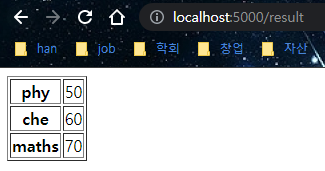
python script
from flask import Flask, render_template
app = Flask(__name__)

@app.route('/result')
def result():
   dict = {'phy':50,'che':60,'maths':70}
   return render_template('result.html', result = dict)

if __name__ == '__main__':
   app.run(debug = True)
html script(result.html)
<!doctype html>
<html>
   <body>
      <table border = 1>
         {% for key, value in result.items() %}
            <tr>
               <th> {{ key }} </th>
               <td> {{ value }} </td>
            </tr>
         {% endfor %}
      </table>
   </body>
</html>
http://localhost:5000/result 접속
9. Static Files
- Application folder
- Hello.py
- templates
- index.html
- static
- hello.js
- 위와 같은 디렉토리 구조 생성
- python script
from flask import Flask, render_template
app = Flask(__name__)

@app.route("/")
def index():
   return render_template("index.html")

if __name__ == '__main__':
   app.run(debug = True)
- html script
<html>
   <head>
      <script type = "text/javascript"
         src = "{{ url_for('static', filename = 'hello.js') }}" ></script>
   </head>

   <body>
      <input type = "button" onclick = "sayHello()" value = "Say Hello" />
   </body>
</html>
- js script
function sayHello() {
   alert("Hello World")
}
- localhost:5000 접속시

- say hello 클릭시

10. Request Object
- request data 프로세스에 중요한 속성들
| 속성 | 설명 |
| Form | dictionary object, 매개변수의 key and value |
| args | ? 뒤의URL의 일부인 쿼리 문자열의 구문 분석된 내용 |
| Cookies | dictionary object, Cookie names and value |
| files | 업로드 파일 |
| method | current request method |
11. Sending Form Data to Template
- data 전달
-python script
from flask import Flask, render_template, request
app = Flask(__name__)

@app.route('/')
def student():
   return render_template('student.html')

@app.route('/result',methods = ['POST', 'GET'])
def result():
   if request.method == 'POST':
      result = request.form
      return render_template("result.html",result = result)

if __name__ == '__main__':
   app.run(debug = True)
- student.html script
<html>
   <body>
      <form action = "http://localhost:5000/result" method = "POST">
         <p>Name <input type = "text" name = "Name" /></p>
         <p>Physics <input type = "text" name = "Physics" /></p>
         <p>Chemistry <input type = "text" name = "chemistry" /></p>
         <p>Maths <input type ="text" name = "Mathematics" /></p>
         <p><input type = "submit" value = "submit" /></p>
      </form>
   </body>
</html>
-result.html
<!doctype html>
<html>
   <body>
      <table border = 1>
         {% for key, value in result.items() %}
            <tr>
               <th> {{ key }} </th>
               <td> {{ value }} </td>
            </tr>
         {% endfor %}
      </table>
   </body>
</html>
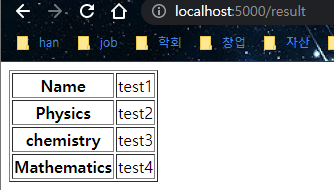
- localhost:5000 접속

- 입력 및 submit 클릭
12. Cookies(???)
- cookie: 컴퓨터 정보 텍스트 파일로 저장 > 더 나은 사용자 경험을 위해 사용자 데이터 추적 및 저장
- Request object에 쿠키 속성도 포함, 만기 시간, 경로, 사이트 도메인 이름도 포함됨
- Flask에서 쿠키는 response object로 설정되어 있음, make_response() > set_cookie()
13. Sessions(???)
14. Redirect & Errors
- redirect() 함수: response object 반환, 상태 코드 위치로 안내
Flask.redirect(location, statuscode, response)- location parameter is the URL where response should be redirected.
- statuscode sent to browser’s header, defaults to 302.
- response parameter is used to instantiate response.
- HTTP_300_MULTIPLE_CHOICES
- HTTP_301_MOVED_PERMANENTLY
- HTTP_302_FOUND(default)
- HTTP_303_SEE_OTHER
- HTTP_304_NOT_MODIFIED
- HTTP_305_USE_PROXY
- HTTP_306_RESERVED
- HTTP_307_TEMPORARY_REDIRECT
15. Message Flashing
- Flask web application에서는 informative message를 쉽게 구현 가능함
- flash() 함수
flash(message, category)- message parameter is the actual message to be flashed.
- category parameter is optional. It can be either ‘error’, ‘info’ or ‘warning’.
- get_flashed_messages()
get_flashed_messages(with_categories, category_filter)- python script
from flask import Flask, flash, redirect, render_template, request, url_for
app = Flask(__name__)
app.secret_key = 'random string'

@app.route('/')
def index():
   return render_template('index.html')

@app.route('/login', methods = ['GET', 'POST'])
def login():
   error = None

   if request.method == 'POST':
      if request.form['username'] != 'admin' or \
         request.form['password'] != 'admin':
         error = 'Invalid username or password. Please try again!'
      else:
         flash('You were successfully logged in')
         return redirect(url_for('index'))

   return render_template('login.html', error = error)

if __name__ == "__main__":
   app.run(debug = True)
- index.html
<!doctype html>
<html>
   <head>
      <title>Flask Message flashing</title>
   </head>
   <body>
      {% with messages = get_flashed_messages() %}
         {% if messages %}
            <ul>
               {% for message in messages %}
               <li<{{ message }}</li>
               {% endfor %}
            </ul>
         {% endif %}
      {% endwith %}

      <h1>Flask Message Flashing Example</h1>
      <p>Do you want to <a href = "{{ url_for('login') }}">
         <b>log in?</b></a></p>
   </body>
</html>
- login.html
<!doctype html>
<html>
   <body>
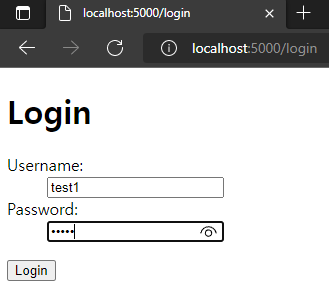
      <h1>Login</h1>

      {% if error %}
         <p><strong>Error:</strong> {{ error }}
      {% endif %}

      <form action = "" method = post>
         <dl>
            <dt>Username:</dt>
            <dd>
               <input type = text name = username
                  value = "{{request.form.username }}">
            </dd>
            <dt>Password:</dt>
            <dd><input type = password name = password></dd>
         </dl>
         <p><input type = submit value = Login></p>
      </form>
   </body>
</html>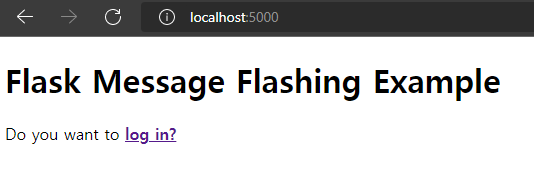

16. File uploading
- flask로 파일 업로드 쉬움
- request.files[]
| app.config[‘UPLOAD_FOLDER’] | Defines path for upload folder |
| app.config[‘MAX_CONTENT_PATH’] | Specifies maximum size of file yo be uploaded – in bytes |
- python script
from flask import Flask, render_template, request
from werkzeug.utils import secure_filename
app = Flask(__name__)

@app.route('/')
def upload_file1():
   return render_template('upload.html')

@app.route('/uploader', methods = ['GET', 'POST'])
def upload_file():
   if request.method == 'POST':
      f = request.files['file']
      f.save(secure_filename(f.filename))
      return 'file uploaded successfully'

if __name__ == '__main__':
   app.run(debug = True)
- html script
<html>
   <body>
      <form action = "http://localhost:5000/uploader" method = "POST"
         enctype = "multipart/form-data">
         <input type = "file" name = "file" />
         <input type = "submit"/>
      </form>
   </body>
</html>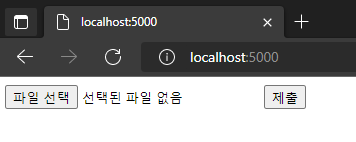


17. Extensions
- Flask Mail − provides SMTP interface to Flask application
- Flask WTF − adds rendering and validation of WTForms
- Flask SQLAlchemy − adds SQLAlchemy support to Flask application
- Flask Sijax − Interface for Sijax - Python/jQuery library that makes AJAX easy to use in web applications
17-1. WTF
- user interface, HTML <form>
- install flask-WTF
pip install flask-WTF- WTF 표준 폼들
| 1 | TextField Represents <input type = 'text'> HTML form element |
| 2 | BooleanField Represents <input type = 'checkbox'> HTML form element |
| 3 | DecimalField Textfield for displaying number with decimals |
| 4 | IntegerField TextField for displaying integer |
| 5 | RadioField Represents <input type = 'radio'> HTML form element |
| 6 | SelectField Represents select form element |
| 7 | TextAreaField Represents <testarea> html form element |
| 8 | PasswordField Represents <input type = 'password'> HTML form element |
| 9 | SubmitField Represents <input type = 'submit'> form element |
- forms.py (formsexample.py와 같은 디렉토리에 저장)
from flask_wtf import FlaskForm
from wtforms import StringField, BooleanField, TextAreaField, SubmitField

class ContactForm(FlaskForm):
    name = StringField("Name")
    email = StringField("Email")
    subject = StringField("Subject")
    message = TextAreaField("Message")
    submit = SubmitField("Send")
- formsexample.py
###############################################
#          Import some packages               #
###############################################
from flask import Flask, render_template, request
from forms import ContactForm
import pandas as pd

###############################################
#          Define flask app                   #
###############################################
app = Flask(__name__)
app.secret_key = 'dev fao football app'


###############################################
#       Render Contact page                   #
###############################################
@app.route('/contactus', methods=["GET", "POST"])
def get_contact():
    form = ContactForm()
    if request.method == 'POST':
        name = request.form["name"]
        email = request.form["email"]
        subject = request.form["subject"]
        message = request.form["message"]
        res = pd.DataFrame({'name': name, 'email': email, 'subject': subject, 'message': message}, index=[0])
        res.to_csv('./contactusMessage.csv')
        return render_template('contact.html', form=form)
    else:
        return render_template('contact.html', form=form)


###############################################
#                Run app                      #
###############################################
if __name__ == '__main__':
    app.run(debug=True)
- contact.html
<!-- here we add our contact forms -->
{% block content %}
<div class="contact">
    <h3>Contact us</h3>
    <form action="{{ url_for('get_contact') }}" method=post>
        <div>
            <!-- name forms -->
            <p>
                {{ form.name.label }} <br>
                {{ form.name(placeholder='Your name') }}
            </p>
            <!-- email forms -->
            <p>
                {{ form.email.label }} <br>
                {{ form.email(placeholder='Your e-mail ...') }}
            </p>
            <!-- Subject of your request -->
            <p>
                {{ form.subject.label }}<br>
                {{form.subject(placeholder='Your subject ...')}}
            </p>
            <!-- Content of your request -->
            <p>
                {{ form.message.label }}<br>
                {{ form.message(placeholder='Write your request ...') }}
            </p>
            <!-- Submit button -->
            <p>
                {{ form.submit }}
            </p>
        </div>
    </form>
</div>

{% endblock %}


<!-- add the right css file -->
{% block styles %}
<link rel="stylesheet" href="{{url_for('.static', filename='styles.css')}}">
{% endblock %}
- localhost:5000/contactus 접속화면

- 내용 입력 후 send 클릭

- 해당 정보가 .csv 파일로 저장됨

17-2. SQLite
- html*4, py*1, html은 templates 디렉토리 안에 있어야함
- home.html
<!DOCTYPE html>
<html lang="ko">
<head>
    <meta charset="UTF-8">
    <meta name="viewport" content="width=device-width, initial-scale=1.0">
    <title>home</title>
</head>
<body>
    <h1>HOME</h1>
    <h2><a href = "/enternew">Add New Record</a></h2>
    <h2><a href = "/list">show list</a></h2>
</body>
</html>
- student_sqlite.html
<html>
   <body>
      <form action = "{{ url_for('addrec') }}" method = "POST">
         <h3>Student Information</h3>
         Name<br>
         <input type = "text" name = "nm" /></br>

         Address<br>
         <textarea name = "add" ></textarea><br>

         City<br>
         <input type = "text" name = "city" /><br>

         PINCODE<br>
         <input type = "text" name = "pin" /><br>
         <input type = "submit" value = "submit" /><br>
      </form>
   </body>
</html>
- result_sqlite.html
<!doctype html>
<html>
   <body>
      result of addition : {{ msg }}
      <h2><a href = "\">go back to home page</a></h2>
   </body>
</html>
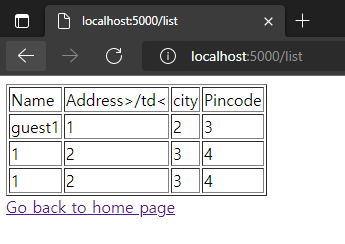
- list.html
<!doctype html>
<html>
   <body>
      <table border = 1>
         <thead>
            <td>Name</td>
            <td>Address>/td<
            <td>city</td>
            <td>Pincode</td>
         </thead>

         {% for row in rows %}
            <tr>
               <td>{{row["name"]}}</td>
               <td>{{row["addr"]}}</td>
               <td> {{ row["city"]}}</td>
               <td>{{row['pin']}}</td>
            </tr>
         {% endfor %}
      </table>

      <a href = "/">Go back to home page</a>
   </body>
</html>
- sqlite.py
from flask import Flask, render_template, request
import sqlite3 as sql
app = Flask(__name__)

@app.route('/')
def home():
    return render_template('home.html')

@app.route('/enternew')
def new_student():
    return render_template('student_sqlite.html')

@app.route('/addrec',methods = ['POST', 'GET'])
def addrec():
    if request.method == 'POST':
        try:
            nm = request.form['nm']
            addr = request.form['add']
            city = request.form['city']
            pin = request.form['pin']

            with sql.connect("database.db") as con:
                cur = con.cursor()
                cur.execute("INSERT INTO students (name,addr,city,pin) VALUES (?,?,?,?)", (nm,addr,city,pin) )

                con.commit()
                msg = "Record successfully added"
        except:
            con.rollback()
            msg = "error in insert operation"
        finally:
            return render_template("result_sqlite.html",msg = msg)
    con.close()

@app.route('/list')
def list():
    con = sql.connect("database.db")
    con.row_factory = sql.Row

    cur = con.cursor()
    cur.execute("select * from students")

    rows = cur.fetchall();
    return render_template("list.html",rows = rows)

if __name__ == '__main__':
    app.run(debug = True)
- localhost:5000 접속

- Add New Record 클릭
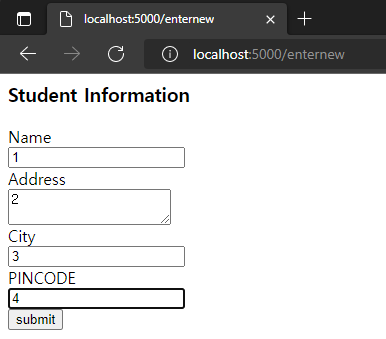
- 정보입력 후 submit
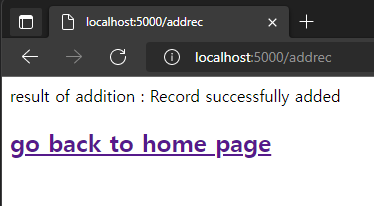
- 결과 확인 후 go back to home page 클릭
- home에서 show list 클릭 하면 입력한 db 볼 수 있음
17-3. SQLAlchemy(???)
- python script
from flask import Flask, request, flash, url_for, redirect, render_template
from flask_sqlalchemy import SQLAlchemy

app = Flask(__name__)
app.config['SQLALCHEMY_DATABASE_URI'] = 'sqlite:///students.sqlite3'
app.config['SECRET_KEY'] = "random string"

db = SQLAlchemy(app)

class students(db.Model):
   id = db.Column('student_id', db.Integer, primary_key = True)
   name = db.Column(db.String(100))
   city = db.Column(db.String(50))
   addr = db.Column(db.String(200))
   pin = db.Column(db.String(10))

def __init__(self, name, city, addr,pin):
   self.name = name
   self.city = city
   self.addr = addr
   self.pin = pin

@app.route('/')
def show_all():
   return render_template('show_all.html', students = students.query.all() )

@app.route('/new', methods = ['GET', 'POST'])
def new():
   if request.method == 'POST':
      if not request.form['name'] or not request.form['city'] or not request.form['addr']:
         flash('Please enter all the fields', 'error')
      else:
         student = students(request.form['name'], request.form['city'],
            request.form['addr'], request.form['pin'])

         db.session.add(student)
         db.session.commit()
         flash('Record was successfully added')
         return redirect(url_for('show_all'))
   return render_template('new.html')

if __name__ == '__main__':
   db.create_all()
   app.run(debug = True)
- new.html
<!DOCTYPE html>
<html>
   <body>
      <h3>Students - Flask SQLAlchemy example</h3>
      <hr/>

      {%- for category, message in get_flashed_messages(with_categories = true) %}
         <div class = "alert alert-danger">
            {{ message }}
         </div>
      {%- endfor %}

      <form action = "{{ request.path }}" method = "post">
         <label for = "name">Name</label><br>
         <input type = "text" name = "name" placeholder = "Name" /><br>
         <label for = "email">City</label><br>
         <input type = "text" name = "city" placeholder = "city" /><br>
         <label for = "addr">addr</label><br>
         <textarea name = "addr" placeholder = "addr"></textarea><br>
         <label for = "PIN">City</label><br>
         <input type = "text" name = "pin" placeholder = "pin" /><br>
         <input type = "submit" value = "Submit" />
      </form>
   </body>
</html>
- show_all.html
<!DOCTYPE html>
<html lang = "en">
   <head></head>
   <body>
      <h3>
         <a href = "{{ url_for('show_all') }}">Comments - Flask
            SQLAlchemy example</a>
      </h3>

      <hr/>
      {%- for message in get_flashed_messages() %}
         {{ message }}
      {%- endfor %}

      <h3>Students (<a href = "{{ url_for('new') }}">Add Student
         </a>)</h3>

      <table>
         <thead>
            <tr>
               <th>Name</th>
               <th>City</th>
               <th>Address</th>
               <th>Pin</th>
            </tr>
         </thead>

         <tbody>
            {% for student in students %}
               <tr>
                  <td>{{ student.name }}</td>
                  <td>{{ student.city }}</td>
                  <td>{{ student.addr }}</td>
                  <td>{{ student.pin }}</td>
               </tr>
            {% endfor %}
         </tbody>
      </table>
   </body>
</html>
17-4. Sijax
- Sijax: Simple Ajax, Python/jQuery library
- 설치
pip install flask-sijax- python script
import os
from flask import Flask, g
from flask_sijax import sijax

path = os.path.join('.', os.path.dirname(__file__), 'static/js/sijax/')
app = Flask(__name__)

app.config['SIJAX_STATIC_PATH'] = path
app.config['SIJAX_JSON_URI'] = '/static/js/sijax/json2.js'
flask_sijax.Sijax(app)

@app.route('/')
def index():
   return 'Index'

@flask_sijax.route(app, '/hello')
def hello():
   def say_hi(obj_response):
      obj_response.alert('Hi there!')
   if g.sijax.is_sijax_request:
      # Sijax request detected - let Sijax handle it
      g.sijax.register_callback('say_hi', say_hi)
      return g.sijax.process_request()
      return _render_template('sijaxexample.html')

if __name__ == '__main__':
   app.run(debug = True)


